


Deploying VMware vSphere Virtual Machines with Packer & Terraform
Today, we will take a look at how to deploy Windows and Linux virtual machines in VMware vSphere using HashiCorp Packer and HashiCorp Terraform.

1. What is Packer?
- A free open-source tool to create images or VMs in multiple platforms (Azure, AWS, Google Cloud, VMware, OpenShift, etc.), created by HashiCorp
- Run on Windows, Unix, Linux & macOS
- Perfect to create templates, build the same image in multiple environments or demos
To automatize the creation of templates in VMware vSphere, there are two major approaches:
- Use the VMware-iso provider. This provider creates VMware VMs from an ISO file as a source. It currently supports building virtual machines on hosts running VMware Fusion for OS X, VMware Workstation for Linux & Windows, and VMware Player on Linux. It can also build machines directly on VMware vSphere Hypervisor using SSH as opposed to the vSphere API.
- Use the vSphere-iso provider. This provider created by JetBrains builds VMs on VMware vSphere directly using vSphere API.
In this article, we will use vsphere-iso provider, because it allows us to create templates remotely directly into the vSphere server.
2. How to Install Packer?
The process is very simple.
- Download the .zip file from https://www.packer.io/downloads.html
- Extract the .ZIP file to a folder
- Add the folder to the path variable
- Download file packer-builder-vsphere-iso.exe from JetBrains-infra vSphere-iso repository at https://github.com/jetbrains-infra/packer-builder-vsphere and copy to the folder where Packer is installed
3. How to Create a Packer Template
Packer templates are JSON files that configure the various components to create machine images.
The template has several sections:
- Variables (optional): This section is used to defines user variables contained in the template.
- Builders (required): This section is the most important and here we define the connection with vCenter, the operating system images, define virtual machine details, and communicators.
- Provisioners (optional): This section installs and configures the machine image after booting.
- Post-processor (optional): This section configures any post-processing that will be done to images built by the builders. Examples of post-processing would be compressing files, uploading images to a datastore, etc.
4. The Variables Section
The variables section allows your Packer templates to be configured with variables from the command-line, environment variables or files. You can define the variables section within your template, or using the command-line -var or -var-file flags and separate files.
"variables": {
  "vsphere-server": "kopi-vsphere-01",
  "vsphere-user": "administrator@kopicloud.local",
  "vsphere-password": "Ins3cur3P@ssw0rd",
  "vsphere-datacenter": "KopiCloud",
  "vsphere-cluster": "Kopi-Cluster",
  "vsphere-network": "VM Network",
  "vsphere-datastore": "Kopi-Datastore",
  "vm-name": "Packer-Template",
  "vm-cpu-num": "1",
  "vm-mem-size": "1024",
  "vm-disk-size": "25600",
  "iso_url": "[Kopi-Datastore] ISO-Linux/CentOS-7-x86_64-1810.iso"
},
5. The Builders Section
The Builders section is responsible for creating machines and generating images from them. Below is a sample template to build a Linux virtual machine.
"builders": [
  {
    "type": "vsphere-iso",

    "vcenter_server": "{{user `vsphere-server`}}",
    "username": "{{user `vsphere-user`}}",
    "password": "{{user `vsphere-password`}}",
    "insecure_connection": "true",

    "datacenter": "{{user `vsphere-datacenter`}}",
    "cluster": "{{user `vsphere-cluster`}}",
    "network": "{{user `vsphere-network`}}",
    "datastore": "{{user `vsphere-datastore`}}",

    "vm_name": "{{user `vm_name`}}",
    "notes": "Build via Packer",
    "convert_to_template": true,

    "ssh_username": "root",
    "ssh_password": "server",    "guest_os_type": "centos7_64Guest",
    "CPUs": 1,
    "RAM": 1024,
    "RAM_reserve_all": false,
    "disk_controller_type": "pvscsi",
    "disk_size": 25000,
    "disk_thin_provisioned": true,
    "network_card": "vmxnet3",    "iso_paths": ["{{user `iso_url`}}"],
    "floppy_files": ["ks.cfg"],
    "boot_command": [
      "<esc><wait>",
      "linux ks=hd:fd0:/ks.cfg<enter>"
    ]
  }
]
6. Dissecting The Builders Section
In this section, we will break the Builders section, and look to each part in detail.
The type is used to define the Packer provider.
"type": "vsphere-iso",
Then, we define the vCenter connection and settings:
"vcenter_server": "{{user `vsphere-server`}}",
"username": "{{user `vsphere-user`}}",
"password": "{{user `vsphere-password`}}",
"insecure_connection": "true","datacenter": "{{user `vsphere-datacenter`}}",
"cluster": "{{user `vsphere-cluster`}}",
"network": "{{user `vsphere-network`}}",
"datastore": "{{user `vsphere-datastore`}}",
After that, we define the virtual machine name, description and if we want to convert into a virtual machine template.
"vm_name": "{{user `vm_name`}}",
"notes": "Build via Packer",
"convert_to_template": true,
The next step is to define the virtual machine settings (OS, CPU, Memory, Disk, NIC).
"guest_os_type": "centos7_64Guest",
"CPUs": 1,
"RAM": 1024,
"RAM_reserve_all": false,
"disk_controller_type": "pvscsi",
"disk_size": 25000,
"disk_thin_provisioned": true,
"network_card": "vmxnet3",
Finally, in our template, we define the ISO file used to install the virtual machines, the files to copy to the floppy disk and two boot commands to launch the unattended install of CentOS or RedHat OS.
It is common to use floppy disks to store unattended kickstart files or scripts.
"iso_paths": ["{{user `iso_url`}}"],
"floppy_files": ["ks.cfg"],
"boot_command": [
  "<esc><wait>",
  "linux ks=hd:fd0:/ks.cfg<enter>"
]
Read How to use Packer to build a Windows Server template for VMware vSphere, to understand in detail, how to build a Windows Server 2016 o Windows Server 2019 template for vSphere.
7. The Provisioners Section
Provisioners use built-in and third-party software to install and configure the machine image after booting. Provisioners prepare the system for use, so common use cases for provisioners include:
- Installing packages
- Patching the operating system
- Creating users
- Downloading application code
Some of the most popular provisioners are:
- Ansible Local & Remote
- Chef Client & Solo
- PowerShell
- Puppet Masterless & Server
- Salt
- Shell Local & Remote
- Windows Restart
- Windows Shell
In the code below, we execute two scripts using the shell, one to install the VMware Tools and one to clean up the virtual machine. After that, it will execute a local Ansible playbook, to configure CentOS settings.
"provisioners": [
  {
    "type": "shell",
    "execute_command": "sudo {{.Vars}} sh {{.Path}}",
    "scripts": [
      "scripts/vmware.sh",
      "scripts/cleanup.sh"
    ]
  },
  {
    "type": "ansible-local",
    "playbook_file": "centos-settings.yml"
  }
]
8. The Post-Processor Section
The optional Post-processors section run after the image is built by the builder and provisioned by the provisioner(s).
Some of the most popular Post-Processors are:
- Amazon Import
- Compress
- Docker Import, Docker Push, Docker Save, Docker Tag
- Google Compute Import & Google Compute Export
- Shell (Local)
- Vagrant, Vagrant Cloud
- vSphere, vSphere Template
9. The Communicators Section
Packer uses communicators to execute scripts, upload files, and other tasks when the machine is created.
Communicators are configured within the builder section. We can use Packer with 2 communicators:
ssh: the SSH connection will be established to the machine. This is the default communicators and is used by Linux (and sometimes for Windows).
"ssh_username": "root",
"ssh_password": "server",
winrm: the WinRM connection will be established, and it is used by Windows machines.
"communicator": "winrm",
"winrm_username": "Administrator",
"winrm_password": "{{user `winadmin-password`}}",
10. Build a VMware Virtual Machine Template
Clone one of my GitHub repositories, and update the template to adjust to your environment.
- Packer Linux Templates → https://github.com/guillermo-musumeci/packer-vsphere-iso-linux.git
- Packer Windows Templates → https://github.com/guillermo-musumeci/packer-vsphere-iso-windows
Open the command line and execute:
packer build packer-template-file.json
This command will start the building process:

A few minutes later the template will be available in our vCenter, and we are ready to create virtual machines.

Now that we have our virtual machine template ready, we are ready to build virtual machines using Terraform.

11. What is Terraform?
Terraform is the most popular Infrastructure as Code (IAC) tool for building, changing, and versioning infrastructure safely and efficiently.
Terraform can manage existing and popular service providers as well as custom in-house solutions (developed in Golang).
Some of the most popular providers supported by Terraform are:
- Azure, Azure AD
- Amazon Web Services
- Cisco ASA/ACI
- F5
- Google Cloud
- Kubernetes
- OpenStack
- Palo Alto
- VMware vSphere / NSX-T / vCloud Director / vRA7
List of all providers → https://www.terraform.io/docs/providers/index.html
12. Installing Terraform
- Download .zip file from https://www.terraform.io/downloads.html
- Extract the .ZIP file to the folder
- Add the folder to the path
- Terraform is available for Windows, macOS, Linux, FreeBSD, OpenBSD & Solaris.
The most popular editor to write Terraform code is Visual Studio Code (VSCode). It is free, open-source and is available for Windows, macOS, and multiple versions of Linux.
Download VSCode at https://code.visualstudio.com. Then, install the Terraform extension by Mikael Olenfalk.
13. Writing Terraform Scripts
In this step, we will write Terraform scripts to deploy two CentOS virtual machines, using the template created by Packer, in the previous steps.
First, create a file called variables.tf, used to store all the variables.
#===========================#
# VMware vCenter connection #
#===========================#variable "vsphere-user" {
type = string
description = "VMware vSphere user name"
}variable "vsphere-password" {
type = string
description = "VMware vSphere password"
}variable "vsphere-vcenter" {
type = string
description = "VMWare vCenter server FQDN / IP"
}variable "vsphere-unverified-ssl" {
type = string
description = "Is the VMware vCenter using a self signed certificate (true/false)"
}variable "vsphere-datacenter" {
type = string
description = "VMWare vSphere datacenter"
}variable "vsphere-cluster" {
type = string
description = "VMWare vSphere cluster"
default = ""
}variable "vsphere-template-folder" {
type = string
description = "Template folder"
default = "Templates"
}#================================#
# VMware vSphere virtual machine #
#================================#variable "vm-count" {
type = string
description = "Number of VM"
default     =  1
}variable "vm-name-prefix" {
type = string
description = "Name of VM prefix"
default     =  "playtftest"
}variable "vm-datastore" {
type = string
description = "Datastore used for the vSphere virtual machines"
}variable "vm-network" {
type = string
description = "Network used for the vSphere virtual machines"
}variable "vm-linked-clone" {
type = string
description = "Use linked clone to create the vSphere virtual machine from the template (true/false). If you would like to use the linked clone feature, your template need to have one and only one snapshot"
default = "false"
}variable "vm-cpu" {
type = string
description = "Number of vCPU for the vSphere virtual machines"
default = "2"
}variable "vm-ram" {
type = string
description = "Amount of RAM for the vSphere virtual machines (example: 2048)"
}variable "vm-name" {
type = string
description = "The name of the vSphere virtual machines and the hostname of the machine"
}variable "vm-guest-id" {
type = string
description = "The ID of virtual machines operating system"
}variable "vm-template-name" {
type = string
description = "The template to clone to create the VM"
}variable "vm-domain" {
type = string
description = "Linux virtual machine domain name for the machine. This, along with host_name, make up the FQDN of the virtual machine"
default = ""
}
Then, create the main.tf file, used to create virtual machines.
# =================== #
# Deploying VMware VM #
# =================== ## Connect to VMware vSphere vCenter
provider "vsphere" {
user = var.vsphere-user
password = var.vsphere-password
vsphere_server = var.vsphere-vcenter# If you have a self-signed cert
allow_unverified_ssl = var.vsphere-unverified-ssl
}# Define VMware vSphere
data "vsphere_datacenter" "dc" {
name = var.vsphere-datacenter
}data "vsphere_datastore" "datastore" {
name = var.vm-datastore
datacenter_id = data.vsphere_datacenter.dc.id
}data "vsphere_compute_cluster" "cluster" {
name = var.vsphere-cluster
datacenter_id = data.vsphere_datacenter.dc.id
}data "vsphere_network" "network" {
name = var.vm-network
datacenter_id = data.vsphere_datacenter.dc.id
}data "vsphere_virtual_machine" "template" {
name = "/${var.vsphere-datacenter}/vm/${var.vsphere-template-folder}/${var.vm-template-name}"
datacenter_id = data.vsphere_datacenter.dc.id
}# Create VMs
resource "vsphere_virtual_machine" "vm" {
count = var.vm-count
name = "${var.vm-name}-${count.index + 1}"
resource_pool_id = data.vsphere_compute_cluster.cluster.resource_pool_id
datastore_id = data.vsphere_datastore.datastore.idnum_cpus = var.vm-cpu
memory = var.vm-ram
guest_id = var.vm-guest-idnetwork_interface {
  network_id = data.vsphere_network.network.id
}disk {
  label = "${var.vm-name}-${count.index + 1}-disk"
  size  = 25
}clone {
  template_uuid = data.vsphere_virtual_machine.template.id
  customize {
    timeout = 0

    linux_options {
      host_name = "node-${count.index + 1}"
      domain = var.vm-domain
    }

    network_interface {}
  }
 }
}
After that, create the terraform.tfvars file, used to store credentials and other variables.
# VMware VMs configuration #
vm-count = "2"
vm-name = "kopik8snode"
vm-template-name = "CentOS7-Template"
vm-cpu = "2"
vm-ram = "4096"
vm-guest-id = "centos7_64Guest"# VMware vSphere configuration ## VMware vCenter IP/FQDN
vsphere-vcenter = "10.100.123.10"# VMware vSphere username used to deploy the infrastructure
vsphere-user = "administrator@kopicloud.local"# VMware vSphere password used to deploy the infrastructure
vsphere-password = "Th1sIsN0tAPassw0rd"# Skip the verification of the vCenter SSL certificate (true/false)
vsphere-unverified-ssl = "true"# vSphere datacenter name where the infrastructure will be deployed
vsphere-datacenter = "KopiCloud-DC"# vSphere cluster name where the infrastructure will be deployed
vsphere-cluster = "KopiCloud-Cluster"# vSphere Datastore used to deploy VMs
vm-datastore = "KopiCloud-Datastore-01"# vSphere Network used to deploy VMs
vm-network = "VM Network"# Linux virtual machine domain name
vm-domain = "kopicloud.local"
14. Execute the Terraform script
Clone my GitHub repository → https://github.com/guillermo-musumeci/terraform-vsphere and update the terraform.tfvars file with your credentials and environment settings.
Initialize Terraform with the following command:
terraform init
This command will initialize providers and provide an initial validation of the Terraform scripts.

Then, execute Terraform with the command below:
terraform apply
This command will validate the configuration and launch the deployment process.

After a few minutes, the virtual machines are available at the vCenter:


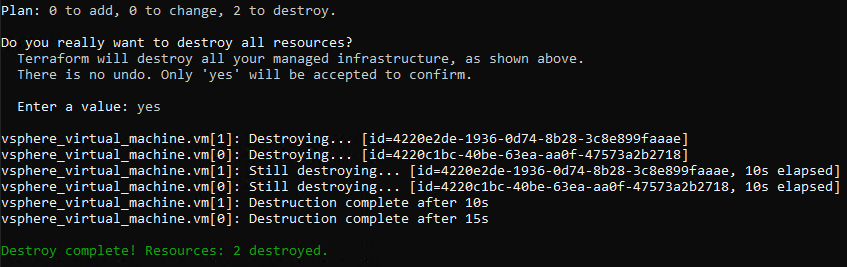
15. Destroy virtual machines
If we don’t need these virtual machines anymore, we can destroy all virtual machines then with one command:
terraform destroy
This command will remove all components and clean up all resources.
And that’s all folks. Thank you for reading!


